
Starting seeds can be one of the most rewarding parts of gardening, but not all seeds germinate evenly or quickly. According to horticulture experts, pre-sprouting—or “pre-germinating”—seeds before planting gives gardeners a jumpstart, improves germination rates, and ensures stronger seedlings. This technique is especially useful for slow-germinating seeds or varieties that require more precise conditions to thrive.
This guide explains the reasons to pre-sprout seeds, the methods to do it effectively, and tips to transition seedlings successfully into soil.
What Is Seed Pre-Sprouting?
Pre-sprouting is the process of encouraging seeds to begin germination before planting them in soil or a growing medium. Essentially, you are giving seeds a head start by providing the right moisture, warmth, and sometimes light conditions.
Experts point out that pre-sprouting can:
- Improve germination rates: Some seeds are notoriously slow or inconsistent; pre-sprouting ensures only viable seeds are planted.
- Reduce wasted space: Only seeds that sprout are planted, saving time and garden real estate.
- Accelerate growth: Pre-sprouted seeds develop stronger roots and shoots earlier, giving plants a competitive advantage.
Which Seeds Benefit Most from Pre-Sprouting?
Not all seeds need pre-sprouting. According to horticulture experts, the technique is most helpful for:
- Hard-coated seeds: Beans, peas, sweet peas, morning glories, and some perennials.
- Slow-germinating seeds: Parsnips, carrots, and certain herbs.
- Small seeds that are hard to sow: Lettuce, celery, and some flower seeds.
For fast-germinating, easy-to-start seeds like tomatoes or radishes, pre-sprouting is optional but can still improve uniformity.
Why Pre-Sprouting Works
Pre-sprouting works by giving seeds:
- Optimal moisture: Seeds absorb water to activate enzymes that begin growth.
- Consistent warmth: Many seeds germinate faster at steady temperatures than in soil.
- Reduced obstacles: Without soil, seeds don’t face compaction, pests, or uneven moisture, allowing sprouting to proceed uninterrupted.
Experts note that pre-sprouting mimics natural conditions: seeds in the wild often germinate in controlled microenvironments before rooting in soil.
Methods for Pre-Sprouting Seeds
There are several methods for pre-sprouting seeds at home.
1. Paper Towel Method
Steps:
- Moisten a paper towel (not soaking wet).
- Place seeds on the towel and fold it over.
- Place the towel in a plastic bag or container to retain moisture.
- Keep in a warm location (usually 65–75°F).
- Check daily for sprouting and moisture.
Advantages:
- Easy to monitor germination
- Reduces wasted seeds
Expert tip: Transplant seeds immediately after roots emerge to prevent damage.
2. Water Soaking Method
Steps:
- Place seeds in a bowl of lukewarm water.
- Soak for 12–24 hours (or longer for hard-coated seeds).
- Drain and transfer seeds to a damp paper towel or directly into soil.
Advantages:
- Softens tough seed coats
- Accelerates germination for beans, peas, and other legumes
Caution: Do not soak too long, as some seeds may rot.
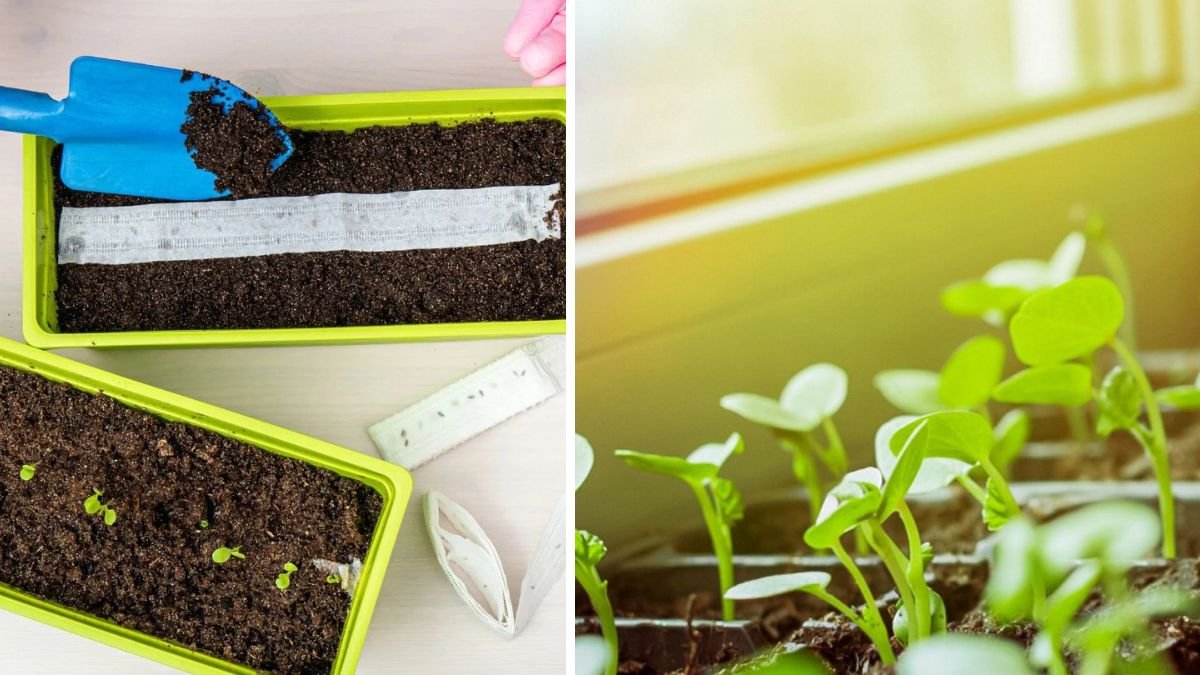
3. Direct Tray Pre-Sprouting
Steps:
- Fill a shallow tray with seed-starting mix or vermiculite.
- Place seeds on the surface or slightly bury them.
- Cover with a clear lid to retain humidity.
- Keep warm and moist until sprouting occurs.
Advantages:
- Easier to transplant seedlings with intact roots
- Less handling than paper towel method
Experts recommend this method for seeds that are sensitive to root disturbance.
Timing and Temperature Considerations
Temperature is critical for pre-sprouting:
- Cool-season crops: Lettuce, cabbage, broccoli prefer 60–70°F.
- Warm-season crops: Tomatoes, peppers, eggplants prefer 70–80°F.
- Hard-coated seeds: Beans, peas, and morning glories may benefit from slightly warmer conditions to soften seed coats.
Check seed packets for specific temperature recommendations. Consistent warmth ensures uniform sprouting.
Monitoring and Managing Moisture
Moisture is the most common factor affecting pre-sprouting success. Experts advise:
- Keep seeds moist but not soggy
- Mist paper towels or tray soil regularly
- Avoid standing water, which can cause rot or fungal issues
Proper moisture levels promote healthy root and shoot development.
Transplanting Pre-Sprouted Seeds
Once seeds have sprouted, careful handling is essential:
- Prepare soil or containers with a high-quality seed-starting mix.
- Plant sprouts gently—roots first, keeping the shoot above soil.
- Water lightly to settle soil around roots.
- Provide adequate light immediately to prevent leggy growth.
Experts stress that transplanting as soon as roots appear prevents the sprouts from becoming stressed or entangled.
Advantages of Pre-Sprouting
- Faster germination: Plants reach maturity sooner, which is especially important in short growing seasons.
- Higher success rate: Only healthy seeds are planted, reducing wasted effort.
- Stronger seedlings: Early root development promotes sturdier plants.
- Predictable timing: Gardeners can schedule planting more accurately, avoiding gaps in production.
For many gardeners, pre-sprouting is a game-changer for both vegetables and flowers.
Common Mistakes to Avoid
- Letting seeds dry out: Dry seeds will fail to germinate.
- Over-soaking: Seeds left in water too long may rot.
- Waiting too long to transplant: Roots can tangle or become damaged if sprouts remain out of soil.
- Ignoring temperature needs: Too cold or too hot slows or stops germination.
Experts recommend careful observation and quick action to ensure the pre-sprouting process benefits the seeds rather than harming them.
Additional Expert Tips
- Label trays or paper towels to avoid confusion between varieties.
- Rotate trays or containers for even light exposure if pre-sprouting under a sunny window.
- Consider using seed heating mats for warmth-loving plants in winter.
- Group seeds by germination speed to streamline transplanting.
These small adjustments maximize the efficiency and success of pre-sprouting.
Final Thoughts
Pre-sprouting seeds is a simple yet highly effective technique to improve germination, strengthen seedlings, and extend the growing season. According to horticulture experts, it works best for hard-coated or slow-germinating seeds, but can benefit nearly any plant by ensuring only healthy seeds are planted.
By providing warmth, moisture, and careful monitoring, gardeners can transform a tray of seeds into a thriving crop of seedlings ready for soil. Pre-sprouting not only saves time and reduces frustration but also results in stronger, more productive plants, giving you a head start on your garden every season.
With a little planning, attention, and the right technique, pre-sprouting can become a key strategy for success in both indoor seed starting and outdoor garden planning.