

Introduction to Growing Carambola from Seed
Growing a carambola tree from seed is an exciting and rewarding DIY gardening project. Carambola, commonly known as starfruit, is loved for its unique shape and refreshing taste. Starting from seed allows gardeners to witness the entire life cycle of this tropical fruit tree. The process requires patience, warmth, and consistent care. Carambola trees thrive in tropical and subtropical climates. With the right techniques, they can also grow in containers. This guide explains each stage clearly for beginners. From seed selection to early care, every detail matters. A well-grown tree can provide fruit for many years.
Understanding the Starfruit Tree Growth Habit
Carambola trees are medium-sized evergreen fruit trees. They grow best in warm climates with high humidity. The tree develops a spreading canopy with delicate, compound leaves. Growth is moderate during the early years. Seed-grown trees take longer to fruit compared to grafted ones. However, they develop strong root systems. Understanding growth habits helps manage expectations. Early care influences long-term productivity. Proper spacing and pruning shape the tree naturally. Knowing how the tree grows improves success rates.
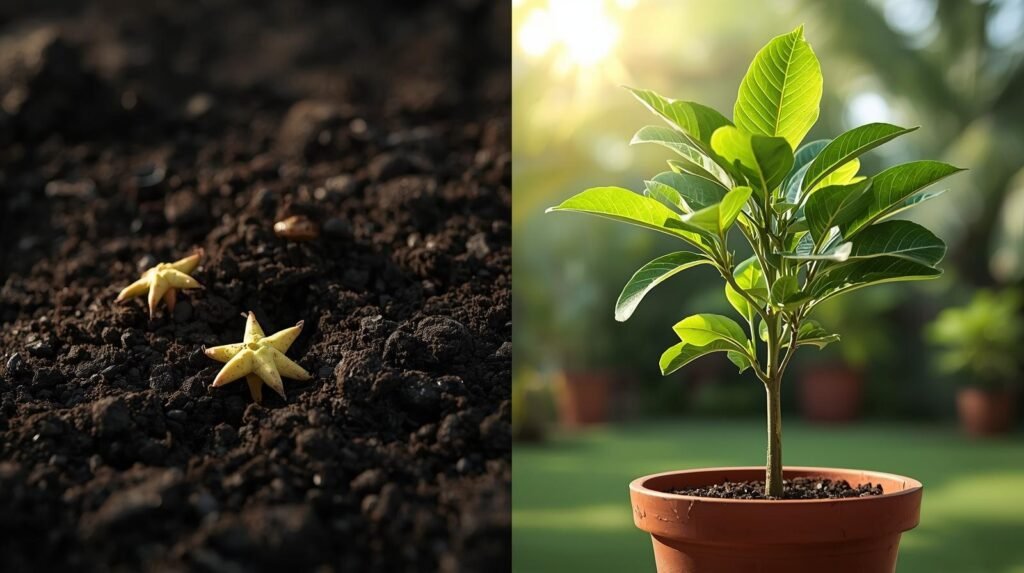
Selecting Fresh and Healthy Starfruit Seeds
Seed quality determines germination success. Always use seeds from fully ripe starfruit. Fresh seeds germinate much faster than dried ones. Avoid seeds that are shriveled or damaged. Rinse seeds thoroughly to remove pulp. Plant seeds soon after extraction. Delaying planting reduces viability. Healthy seeds are plump and light brown. Selecting good seeds ensures strong seedlings. This step forms the foundation of the entire process.
Preparing the Soil for Seed Germination
Starfruit seeds need well-draining, nutrient-rich soil. A mix of garden soil, compost, and sand works best. Organic matter improves moisture retention without waterlogging. Slightly acidic soil is ideal for carambola. Sterilizing soil reduces fungal risks. Loose soil allows roots to expand freely. Good soil preparation prevents early problems. Avoid heavy clay soils. Proper soil structure encourages healthy germination. Soil quality directly affects early growth.
Planting the Starfruit Seeds Correctly
Plant seeds about one inch deep in moist soil. Cover lightly and press gently. Water immediately after planting. Use small pots with drainage holes. Place pots in a warm, shaded location. Avoid direct sunlight at this stage. Maintain consistent moisture without flooding. Germination usually occurs within two weeks. Proper planting depth supports uniform sprouting. Early care ensures strong seedling development.
Watering Requirements During Early Growth
Watering must be balanced during germination. Soil should remain moist but not soggy. Overwatering can cause seed rot. Underwatering delays sprouting. Use room-temperature water. Water lightly once or twice daily depending on climate. Good drainage prevents root problems. Consistency is more important than quantity. Monitor soil moisture regularly. Proper watering supports steady growth.
Light Needs for Young Starfruit Seedlings
Young seedlings prefer bright, indirect sunlight. Direct sun can burn tender leaves. Place seedlings near a sunny window or shaded outdoor area. Gradually increase sun exposure as the plant grows. Light encourages healthy leaf development. Too little light causes weak stems. Balanced lighting improves growth rate. Rotate pots for even exposure. Proper light management strengthens seedlings. Healthy leaves indicate correct lighting conditions.
Temperature and Humidity Control
Carambola thrives in warm temperatures. Ideal temperatures range between twenty to thirty degrees Celsius. Cold slows growth and can damage seedlings. High humidity supports leaf expansion. Dry air may cause leaf drop. Misting helps maintain humidity. Indoor growers may use humidity trays. Stable conditions prevent stress. Sudden changes should be avoided. Temperature and humidity greatly influence growth success.
Early Leaf and Stem Development
Seedlings produce soft, compound leaves initially. Leaves may fold at night, which is normal. Stem growth is slow at first. Focus remains on root establishment. Avoid handling seedlings frequently. Healthy leaves are green and flexible. Yellowing may indicate nutrient issues. Observe growth patterns carefully. Early leaf development signals successful establishment. Gentle care supports strong stems.
Fertilizing Starfruit Seedlings
Young seedlings require minimal fertilization. Too much fertilizer can burn roots. Use diluted organic fertilizer after true leaves appear. Compost tea works well for gentle feeding. Apply fertilizer once every few weeks. Observe plant response carefully. Fertilization supports leaf and root growth. Balanced nutrition prevents deficiencies. Avoid chemical fertilizers early on. Slow feeding encourages steady growth.
Transplanting Seedlings to Larger Containers
Transplant seedlings when they outgrow small pots. Choose containers with proper drainage. Water seedlings before transplanting. Gently loosen roots to avoid damage. Place in fresh soil mix. Fill gaps carefully and water lightly. Avoid disturbing the main root. Transplant shock can slow growth temporarily. Proper technique ensures quick recovery. Larger containers support continued development.
Pruning Young Starfruit Trees
Pruning helps shape the tree early. Remove weak or damaged branches. Encourage a strong central stem. Avoid heavy pruning during early stages. Light pruning improves airflow. Proper shaping supports future fruiting. Pruning reduces overcrowding. Healthy structure improves sunlight penetration. Early pruning simplifies long-term maintenance. Strategic cuts improve overall growth.
Common Problems and Solutions
Overwatering is the most common issue. Poor drainage leads to root rot. Yellow leaves may signal nutrient imbalance. Pest infestations can slow growth. Use organic pest control methods. Fungal issues arise from poor airflow. Adjust watering and light conditions. Early detection prevents severe damage. Regular observation is essential. Healthy plants recover quickly from minor issues.
Pest and Disease Management
Starfruit trees may attract aphids and mites. Inspect leaves regularly. Use neem oil or soap sprays. Avoid harsh chemicals. Maintain clean surroundings. Good airflow reduces disease risk. Remove infected leaves promptly. Healthy plants resist pests better. Integrated pest management works best. Prevention is easier than treatment. Organic methods protect plant health.
Growth Expectations from Seed
Seed-grown starfruit trees grow slowly initially. Root development takes priority. Visible growth increases after the first year. Fruiting may take three to five years. Patience is essential. Proper care shortens waiting time. Strong seedlings develop into productive trees. Early investment pays off later. Growth rate depends on environment. Long-term commitment brings rewarding results.
Indoor vs Outdoor Growing Options
Starfruit can be grown indoors in containers. Outdoor growth is best in warm climates. Indoor plants need bright light and humidity. Outdoor trees require protection from cold. Container growing allows mobility. Choose based on climate conditions. Both methods require consistent care. Adapt techniques accordingly. Flexibility improves success. Environment determines growth potential.
Long-Term Care Planning
Starfruit trees need regular watering and feeding. Pruning maintains shape and productivity. Mulching improves soil moisture. Protect from frost if needed. Monitor for pests regularly. Long-term care ensures fruit quality. Planning ahead prevents issues. Healthy trees live for decades. Consistent care supports high yields. Gardening patience brings lasting rewards.
Table: Starfruit Seed Growing Checklist
Step
Select fresh ripe starfruit seeds
Step
Prepare well-draining organic soil
Step
Plant seeds one inch deep
Step
Maintain moisture and warmth
Step
Provide indirect sunlight
Step
Fertilize lightly after true leaves
Step
Transplant to larger containers
Step
Prune lightly for shape