
Introduction: Fresh, Healthy Sprouts at Home
Bean sprouts are a nutritious powerhouse, loaded with protein, fiber, and vitamins. Popular in salads, soups, stir-fries, and sandwiches, sprouts are often purchased from stores, packed in plastic containers that sometimes raise concerns about freshness and contamination. Growing bean sprouts at home ensures you enjoy fresh, chemical-free produce, with minimal space and cost.
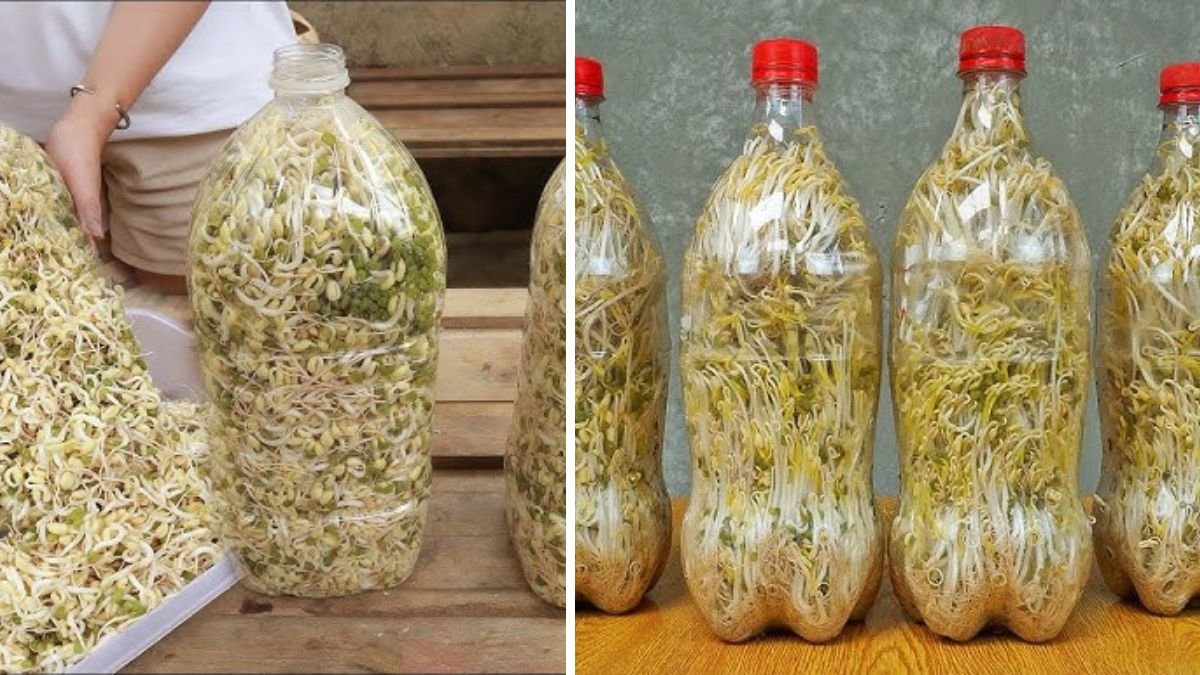
A surprisingly easy and eco-friendly method is to grow them in recycled plastic bottles or containers. This method saves money, reduces plastic waste, and gives you a continuous supply of fresh sprouts right on your kitchen counter. Whether you live in an apartment or a house with limited space, this method is perfect for urban gardening enthusiasts.
Why Grow Bean Sprouts at Home?
Growing your own sprouts comes with multiple benefits:
- Nutrition: Freshly sprouted beans are richer in vitamins and enzymes compared to store-bought options.
- Cost-effective: A small quantity of dry beans can produce a large yield of sprouts.
- Sustainability: Using recycled bottles or containers reduces plastic waste.
- Control over quality: You choose the beans, ensuring they are chemical-free and safe.
Sprouting is simply the early stage of germination, where a seed begins to grow into a tiny plant. By providing moisture and air, but limiting light and soil, the seed sprouts into nutrient-packed greens ready to eat in just a few days.
What You’ll Need
Before starting, gather the following materials:
- Whole dry beans suitable for sprouting, such as mung beans, lentils, or chickpeas.
- Clean plastic bottles or containers (recycled soda bottles, Tupperware, or similar).
- Clean water for soaking and rinsing.
- Optional: Cheesecloth or mesh and rubber bands to cover containers for proper drainage.
- A dark, warm spot for sprouting (avoiding direct sunlight).
This setup requires minimal equipment and is perfect for small kitchens or countertop gardening.
Step 1: Preparing Your Plastic Container
Begin by thoroughly cleaning your plastic bottle or container to remove any dirt or residues. If using a soda bottle:
- Option A: Cut the top off to create an open container.
- Option B: Cut the bottle in half and invert the top into the bottom to create a self-draining sprouter.
Proper drainage is essential to prevent mold and spoilage, as stagnant water can ruin your sprouts. Using mesh or cheesecloth with a rubber band over the opening can also help drain water effectively.
Step 2: Soak the Beans
Take 2–3 tablespoons of beans and rinse them under clean water. Then, soak them overnight (8–12 hours) in enough water to cover them fully. Soaking softens the seed coat and initiates germination.
- Mung beans and lentils typically require 8–12 hours.
- Chickpeas may require slightly longer, around 12 hours.
After soaking, drain the water completely. Beans should remain moist but not sitting in water. Proper soaking improves sprouting success and ensures uniform growth.
Step 3: Rinse and Drain Daily
Rinse the soaked beans with fresh water twice daily and drain thoroughly each time. This keeps the beans hydrated while preventing bacterial or mold growth.
- Hold the bottle upside down to drain water, or use a mesh/cheesecloth setup.
- Consistent rinsing ensures faster, healthier sprouts.
- Avoid letting beans sit in standing water.
A well-drained container is crucial for successful sprouting. Beans need moisture, air circulation, and cleanliness to grow properly.
Step 4: Keep Sprouts in a Dark, Warm Place
Place the container in a cool, dark spot away from direct sunlight. While some light is acceptable at the final stages if you want greener sprouts, darkness is ideal for initial growth.
- Warmth encourages germination; room temperature (20–25°C or 68–77°F) is perfect.
- Avoid cold or overly dry areas, as these can slow growth or dry out sprouts.
Step 5: Harvesting Your Bean Sprouts
The sprouting time depends on the type of bean:
- Mung beans: 3–5 days
- Lentils: 4–6 days
- Chickpeas: 5–7 days
When sprouts reach 1–2 inches in length, they’re ready to harvest. Drain and rinse them one final time before consumption or storage. They should be crisp, white or pale green, and free from sliminess or unpleasant odor.
Step 6: Storing Your Sprouts
After harvesting, store sprouts in a sealed container in the refrigerator. Fresh sprouts stay crisp for 3–5 days. For best taste and nutrition, consume them as soon as possible.
Sprouts can be used in:
- Salads and sandwiches
- Stir-fries and soups
- Wraps and smoothies
- Garnishes for rice or noodle dishes
Sprouts add crunch, flavor, and a nutritional boost to your meals.
Tips for Success
- Clean Equipment: Wash containers thoroughly before each batch to avoid bacterial contamination.
- Proper Drainage: Never let beans sit in water after soaking.
- Avoid Overcrowding: Give beans enough space for airflow.
- Rinse Twice Daily: Regular rinsing ensures faster and healthier sprouting.
- Control Light Exposure: Keep sprouts in a dark, warm area for best results.
Following these tips helps you achieve crisp, fresh, and safe sprouts every time.
Common Mistakes to Avoid
- Using old or damaged beans: Only use fresh, whole beans.
- Overcrowding containers: Crowding can cause uneven growth and mold.
- Insufficient rinsing: Skipping rinses allows bacteria to thrive.
- Excessive sunlight: Direct sunlight can overdry the sprouts or make them bitter.
Paying attention to these details ensures high-quality sprouts consistently.
Why Plastic Bottle Sprouting Works
Using plastic bottles as sprouting containers is popular for several reasons:
- Eco-friendly: Recycles plastic waste.
- Space-saving: Bottles can fit in small kitchens or countertops.
- Cost-effective: No need for expensive sprouting trays.
- Visual monitoring: Transparent bottles allow you to observe growth and detect issues early.
This method is ideal for urban dwellers or anyone with limited gardening space.
Recent Trends and Innovations
Home sprouting is seeing a resurgence as people embrace sustainable living and homegrown food. While traditional jar methods remain popular, plastic bottle sprouters are trending as an accessible, DIY solution.
- Ideal for apartment kitchens
- Reduces store-bought plastic waste
- Offers an easy, continuous supply of fresh greens
These methods align perfectly with zero-waste lifestyles and urban gardening trends.
Recommended Authoritative Sources
- Homes & Gardens – Grow Bean Sprouts at Home Tips: homesandgardens.com
- Gardener Guidebook – Plastic Bottle Sprouting Method: gardenerguidebook.com
- Gardening Soul – DIY Bean Sprouts: gardeningsoul.com
- PBS Learning Media – Sprouting Basics: static.pbslearningmedia.org
Conclusion
Growing bean sprouts at home in plastic bottles is a simple, cost-effective, and sustainable way to enjoy fresh, crunchy, and healthy greens. With minimal equipment, a bit of planning, and consistent rinsing, anyone can have a continuous supply of nutrient-rich sprouts.
This DIY method is perfect for urban kitchens, environmentally conscious gardeners, and health enthusiasts. By following these steps, tips, and safety practices, you can ensure delicious, fresh, and safe bean sprouts year-round.
Sprouting at home not only reduces waste but also allows you to connect with your food, experiment with different beans, and enjoy a sustainable, healthy lifestyle — one crunchy sprout at a time.