
Why Propagate Berry Bushes from Cuttings?
Starting berry bushes from cuttings is one of the simplest, most cost-effective ways to grow your garden. Instead of buying expensive nursery plants, you can create new bushes from healthy parent plants in your own backyard. This method allows you to clone plants that already produce well, ensuring your new bushes inherit the same quality and taste.
Cuttings are ideal because they bypass the slow, unpredictable process of growing berries from seeds. With a little care, patience, and attention to timing, you can create thriving plants in a few months. This approach is beginner-friendly and has a high success rate when done correctly. (aol.com)
Understanding Cuttings: Softwood vs. Hardwood
There are two primary types of cuttings used in berry propagation:
Softwood Cuttings:
- Taken in late spring or early summer.
- Use new, flexible green shoots.
- Root faster but are more delicate.
Hardwood Cuttings:
- Taken from mature woody stems during late fall or winter.
- Thicker, pencil-sized stems.
- Hardier, easier for beginners, but take longer to root.
Knowing which type of cutting to use depends on your plant species, climate, and timing. Both methods can produce successful results if executed properly. (gardenbotany.com)
Step-by-Step Guide to Starting Berry Bushes from Cuttings
1. Select a Healthy Stem
Choose a branch that is free of disease or pests. Softwood cuttings should be green and flexible, while hardwood cuttings should be firm, mature stems. Each cutting should ideally be 6–12 inches long with several leaf nodes.
2. Make a Clean Cut
Use sterilized, sharp pruning shears to make a clean cut at a slight angle, just below a leaf node. This ensures water runoff and minimizes the risk of infection. Clean cuts are critical for successful rooting.
3. Remove Lower Leaves
For softwood cuttings, remove leaves from the bottom half of the stem. This prevents rot and makes planting easier. Hardwood cuttings usually have fewer leaves, so minimal trimming is needed.
4. Optional: Apply Rooting Hormone
While optional, dipping cuttings in rooting hormone can significantly increase your success rate. It stimulates root growth, especially in hardwood cuttings that take longer to establish.
5. Prepare the Potting Medium
Use a well-draining soil mix, such as perlite blended with coconut coir, peat moss, or a seed-starting mix. The soil should be moist but not waterlogged, providing an ideal environment for roots to develop.
6. Plant the Cutting
Insert each cutting 2–4 inches deep into the prepared soil. Firm the soil gently around the base to hold it upright. Make sure the cuttings are stable but not compacted too tightly.
7. Create a Humid Environment
Cover your pots with a clear plastic bag or a small greenhouse dome. This traps humidity around the cuttings, reducing water loss and helping them root. Ensure the cover does not touch leaves, as this can cause mold.
8. Place in Bright, Indirect Light
Cuttings need light but should avoid direct sunlight, which can stress them. A bright windowsill or a partially shaded outdoor area works well. Maintaining moderate temperatures helps roots develop faster.
9. Water and Monitor
Keep the soil evenly moist, misting the cuttings if needed. Avoid soggy conditions, which can lead to rot. Monitor daily for signs of mold or wilting. Patience is key: rooting may take several weeks to months.
10. Transplant Once Rooted
When roots are strong and new growth appears, transplant your cuttings into larger pots or your garden. For best results, do this in the fall or the following spring, depending on your climate.
Tips for Maximum Success
- Label Everything: Mark each pot with the plant type and date to keep track of progress.
- Avoid Puddles: Never let water accumulate at the base; this can cause root rot.
- Be Patient: Some berries, like blueberries, may take months to show new shoots.
- Adjust Light and Humidity: Softwood cuttings may need more careful humidity control, while hardwood cuttings are hardier.
- Use Quality Tools: Sharp, clean shears reduce damage and prevent disease.
Troubleshooting Common Issues
Cuttings not rooting: Check moisture levels; too dry or too wet can kill cuttings. Ensure you are using a well-draining medium.
Leaves wilting or yellowing: This often means excessive sunlight or low humidity. Adjust conditions and mist lightly.
Mold or fungus: Remove affected cuttings and improve airflow under the humidity cover.
Slow root development: This can be normal for hardwood cuttings. Patience is essential—avoid disturbing the cuttings too soon.
FAQ
Q: Can all berry bushes be propagated this way?
Yes. Raspberries, blueberries, blackberries, currants, and gooseberries can all be grown from cuttings with slight adjustments for timing and care. (aol.com)
Q: Which is easier: layering or cuttings?
Layering (bending a branch into the soil to root while still attached) is easier for beginners, especially with raspberries and blackberries, but produces fewer plants at a time. Cuttings allow you to propagate multiple plants simultaneously. (globalowls.com)
Authoritative Sources for Further Reading
- Almanac – How To Take Fruit Bush Cuttings for New Plants (almanac.com)
- Gardener’s Path – How to Propagate Blueberry Bushes (gardenerspath.com)
- Gardening Know How – Propagating Blueberries From Cuttings (gardeningknowhow.com)
- GardenBotany – Berry Bush Cuttings Guide (gardenbotany.com)
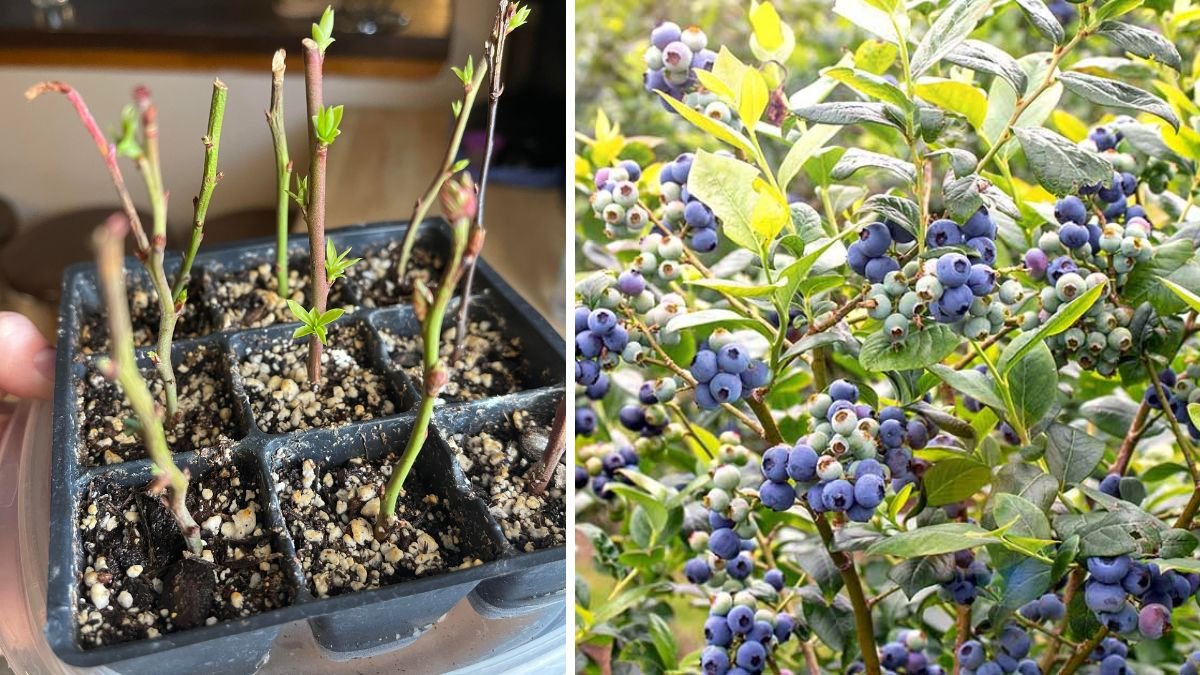
Feature Image Concept
A visually engaging image would show berry bush cuttings in small pots under a humidity dome, with bright green shoots emerging. A soft, sunlit background representing a greenhouse or indoor garden will communicate growth, freshness, and beginner-friendly gardening.
Meta Details
- Title Tag: How to Start Berry Bushes from Cuttings—It’s Easier Than You Think | Beginner’s Guide
- Meta Description: Simple step-by-step instructions to start berry bushes from cuttings at home. Save money and grow more plants with these expert propagation tips!
- Focus Keyword: [FOCUS KEYWORD]
- URL Slug: how-to-start-berry-bushes-from-cuttings-easier-than-you-think