
Peace lilies (Spathiphyllum) are among the most popular houseplants thanks to their glossy green leaves, elegant white blooms, and reputation for being easy to care for. However, even the most low-maintenance plants need occasional attention, and repotting is one of the most important tasks for keeping a peace lily healthy long term. When done correctly, repotting refreshes the soil, relieves root crowding, and gives your plant the space it needs to thrive.
If your peace lily has started drooping more often, dries out quickly, or has roots poking through the drainage holes, it’s likely time for a new pot. The good news is that repotting doesn’t have to be complicated. With the right timing and a gentle approach, you can repot your peace lily the right way in just five simple steps.
Why Repotting a Peace Lily Is So Important
Peace lilies are vigorous growers, especially when they’re happy with their environment. Over time, their roots fill the pot, becoming compacted and tangled. This root-bound condition restricts water absorption and nutrient uptake, which can lead to yellowing leaves, reduced flowering, and frequent wilting even when the soil is moist.
Repotting solves these issues by giving the roots fresh soil and more room to grow. It also improves drainage, reduces the risk of root rot, and encourages stronger, healthier foliage. Most peace lilies benefit from repotting every one to two years, depending on growth rate and pot size.
When Is the Best Time to Repot a Peace Lily?
Timing plays a big role in successful repotting. The best time to repot a peace lily is in spring or early summer, just as the plant enters its active growing phase. During this period, the plant can recover quickly and establish new roots with minimal stress.
You should consider repotting if you notice any of the following signs:
- Roots growing out of the drainage holes
- Soil drying out very quickly after watering
- Stunted growth or fewer blooms
- Leaves drooping frequently despite proper watering
Avoid repotting during winter unless absolutely necessary, as peace lilies grow more slowly and may struggle to adapt.
What You’ll Need Before You Start
Preparing everything ahead of time makes the process smooth and stress-free for both you and the plant. You’ll need a new pot that’s one to two inches larger in diameter than the current one, fresh well-draining potting mix, clean pruning scissors or shears, and water.
Choose a pot with drainage holes, as peace lilies are sensitive to standing water. For soil, a high-quality indoor plant mix works well, especially one containing peat moss and perlite to balance moisture retention and drainage.
Step 1: Prepare the New Pot and Soil
Start by adding a layer of fresh potting mix to the bottom of the new pot. This base layer helps position the peace lily at the correct height and prevents the roots from sitting directly on the drainage holes.
The goal is to have the top of the root ball sit about an inch below the rim of the pot once planted. This spacing allows room for watering without overflow and keeps the crown of the plant from being buried too deeply.
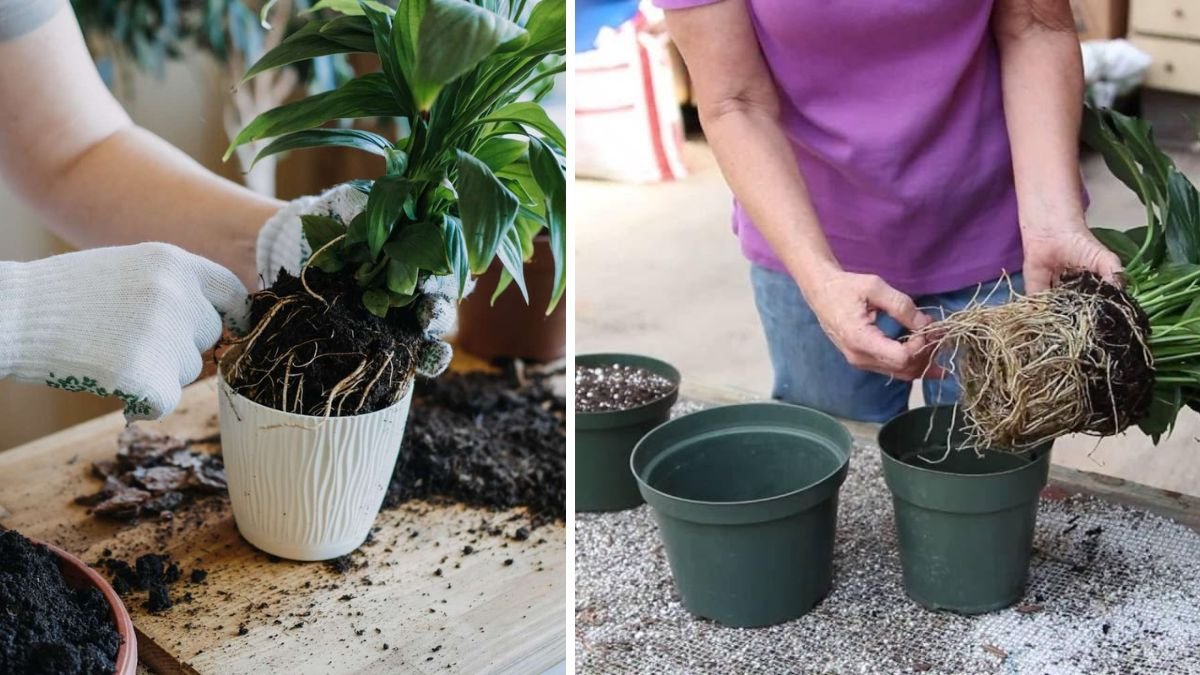
Step 2: Gently Remove the Peace Lily from Its Current Pot
Removing the plant carefully is crucial to avoid damaging the roots. Hold the base of the plant and gently tip the pot on its side. If the plant doesn’t slide out easily, tap the sides of the pot or run a dull knife along the inside edge to loosen the root ball.
Avoid pulling on the leaves or stems. Peace lily foliage is soft and can tear easily. Once removed, you should see a dense root system, especially if the plant was overdue for repotting.
Step 3: Inspect and Loosen the Roots
With the plant out of its pot, gently brush away some of the old soil to expose the roots. Healthy roots should be firm and light in color. If you notice dark, mushy, or foul-smelling roots, trim them away with clean, sanitized scissors.
If the roots are tightly wrapped around the root ball, gently tease them apart with your fingers. This encourages the roots to grow outward into the new soil instead of continuing to circle themselves, which can restrict growth over time.
Step 4: Place the Peace Lily in the New Pot
Set the peace lily into the center of the new pot, making sure it’s sitting at the correct height. Hold it steady while you add fresh potting mix around the sides, filling in evenly.
Lightly press the soil down to remove large air pockets, but don’t pack it too tightly. Peace lily roots need oxygen as much as they need moisture. The soil should feel firm yet airy.
Once filled, check that the plant is upright and stable. Adjust as needed before moving on to the final step.
Step 5: Water Thoroughly and Let the Plant Settle
After repotting, water the peace lily deeply until water drains from the bottom of the pot. This helps the soil settle around the roots and reduces transplant shock.
Place the plant in bright, indirect light and allow it to rest. It’s normal for a peace lily to droop slightly for a few days after repotting. As long as the soil stays lightly moist and the plant isn’t exposed to harsh sunlight or drafts, it should recover quickly.
Caring for Your Peace Lily After Repotting
Post-repotting care is just as important as the repotting process itself. For the first few weeks, focus on maintaining consistent moisture without overwatering. Allow the top inch of soil to dry slightly between waterings.
Avoid fertilizing for at least four to six weeks after repotting. Fresh potting mix already contains nutrients, and fertilizing too soon can burn sensitive new roots. Once the plant is settled, resume feeding during the growing season with a balanced, diluted fertilizer.
Peace lilies prefer bright, indirect light and moderate to high humidity. Keeping them away from direct sun, heating vents, and cold drafts will help prevent stress and leaf damage.
Common Repotting Mistakes to Avoid
One common mistake is choosing a pot that’s too large. While it may seem beneficial to give the plant plenty of room, oversized pots hold excess moisture and increase the risk of root rot. Always size up gradually.
Another mistake is compacting the soil too firmly. Dense soil restricts airflow and slows root growth. Lastly, skipping drainage holes or leaving water in the saucer can quickly undo all your repotting efforts.
Final Thoughts
Learning how to repot a peace lily the right way is a simple but powerful skill for any plant owner. By following these five straightforward steps—preparing the pot, gently removing the plant, caring for the roots, positioning it correctly, and watering thoroughly—you set your peace lily up for healthier growth and more abundant blooms.
With fresh soil, a properly sized pot, and attentive care, your peace lily will reward you with lush foliage and elegant flowers for years to come. Repotting may take only a short time, but the benefits last far longer, making it one of the best things you can do for this classic indoor plant.