
Introduction to Oleander Plant
Oleander is a popular ornamental flowering shrub grown widely in gardens, parks, and along roadsides. It is valued for its evergreen leaves, attractive flowers, and ability to thrive in harsh conditions. Oleander plants are drought tolerant and grow well in tropical and subtropical climates. Gardeners prefer oleander because it requires minimal care once established. Propagation through cuttings is the easiest and fastest way to grow new oleander plants. This method produces plants identical to the parent plant. It is ideal for home gardeners and nurseries. Understanding the correct technique ensures high success rates.
Why Choose Cutting Propagation for Oleander
Oleander cutting propagation is preferred over seed propagation due to reliability. Seeds may not produce true-to-type plants, while cuttings ensure identical flower color and growth habit. Cuttings root quickly when proper conditions are provided. This method saves time compared to growing from seeds. It is cost-effective and requires minimal tools. Cutting propagation also allows gardeners to multiply healthy plants easily. Even beginners can achieve good results. This technique is widely practiced in nurseries.
Best Time for Oleander Cutting Propagation
Season plays an important role in successful propagation. The best time to propagate oleander from cuttings is during spring and early summer. During this period, plants are actively growing and root formation is faster. Warm temperatures encourage callus development. Avoid extreme winter cold or peak summer heat. Moderate humidity supports rooting. Morning hours are ideal for taking cuttings. Seasonal timing significantly improves success rates. Choosing the right time reduces plant stress.
Selecting Healthy Oleander Cuttings
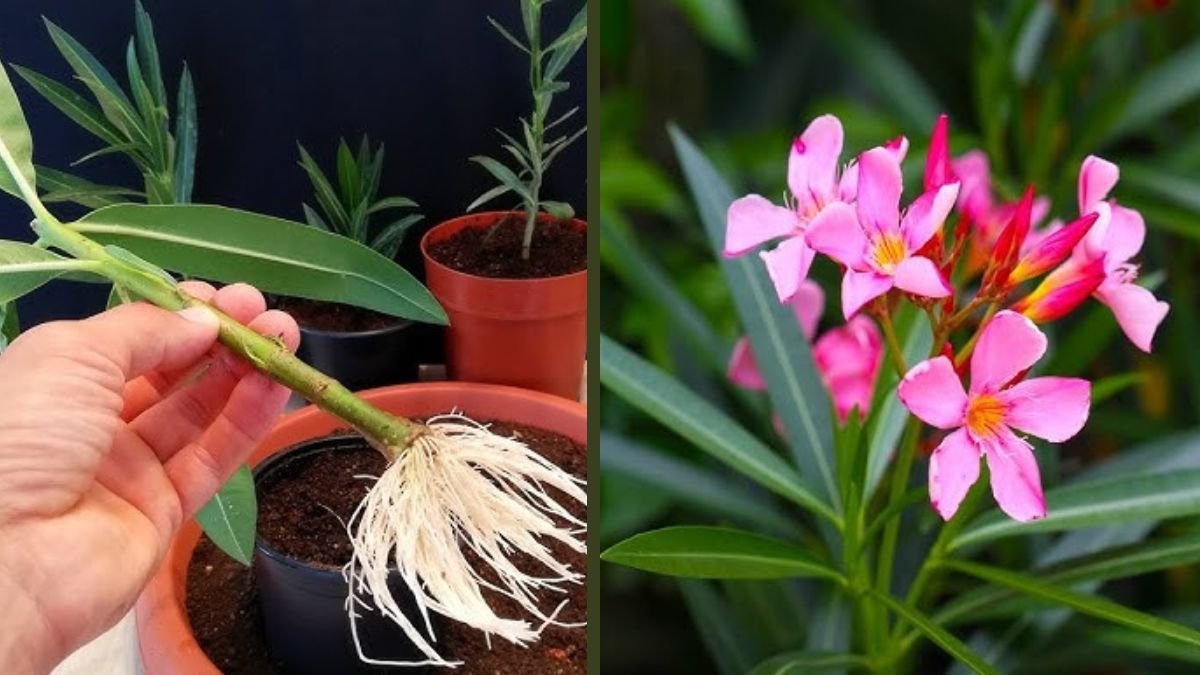
Selection of cutting material determines success. Always choose a healthy, disease-free parent plant. Semi-hardwood cuttings work best for oleander. Cuttings should be about fifteen to twenty centimeters long. Avoid very soft or very woody stems. The cutting should have several leaf nodes. Leaves should appear green and healthy. Remove flowers or buds if present. Good selection ensures faster rooting.
Preparing Oleander Cuttings
Proper preparation helps prevent rotting and infection. Use a sharp, clean knife or pruning shears. Make a clean cut just below a leaf node. Remove lower leaves, leaving only a few at the top. This reduces moisture loss. The cut end can be dipped in rooting hormone, though oleander roots easily without it. Allow the cutting to rest for a short time. This helps seal the cut. Proper preparation increases survival.
Rooting Medium for Oleander Cuttings
A well-draining medium is essential. A mixture of garden soil, sand, and compost works well. Coco peat and sand can also be used. The medium should retain moisture without becoming waterlogged. Good aeration encourages root development. Avoid heavy clay soil. Sterile medium reduces fungal infection. Fill pots or trays before planting. Lightly moisten the medium. Proper soil choice supports healthy roots.
Planting Oleander Cuttings
Insert the prepared cutting into the rooting medium. Plant it deep enough to cover at least two nodes. Firm the soil gently around the cutting. Ensure the cutting stands upright. Water lightly after planting. Avoid overwatering at this stage. Place the pot in a shaded location. Indirect sunlight is ideal. Proper planting technique supports root initiation.
Watering and Moisture Management
Moisture balance is critical during propagation. The soil should remain slightly moist at all times. Overwatering can cause stem rot. Underwatering may dry out the cutting. Use a spray bottle if necessary. Humidity helps root formation. Covering the pot with a plastic bag can retain moisture. Ensure some air circulation. Proper moisture management improves success.
Light and Temperature Requirements
Oleander cuttings prefer bright but indirect light. Direct sunlight can cause dehydration. A warm environment promotes rooting. Ideal temperature ranges from twenty to thirty degrees Celsius. Avoid placing cuttings in cold or windy areas. Indoor propagation near a window works well. Outdoor propagation requires shade. Stable temperature improves root development.
Root Development and Growth Signs
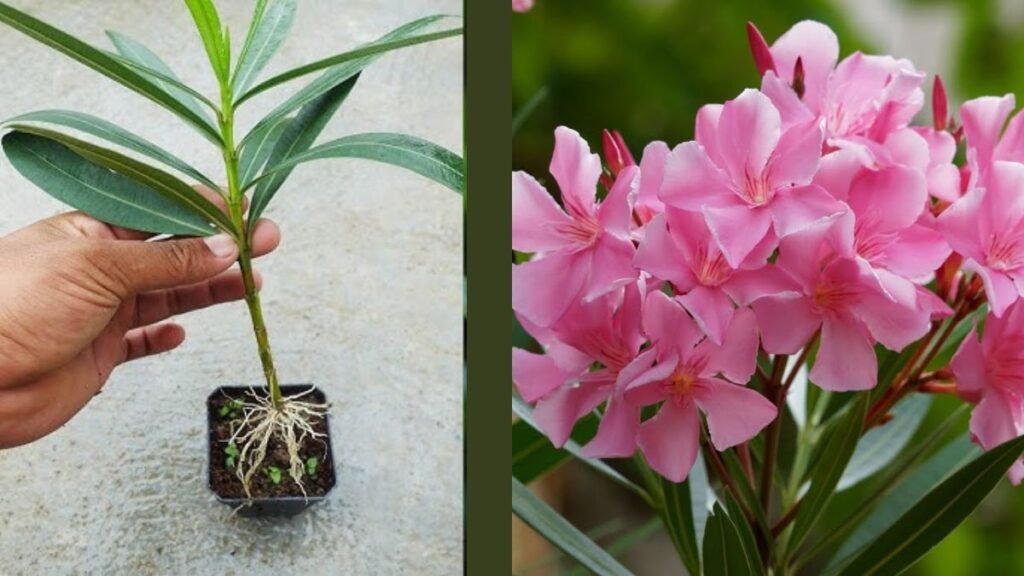
Roots usually develop within three to four weeks. New leaf growth indicates successful rooting. Gently tug the cutting to feel resistance. Healthy cuttings remain green and firm. Yellowing leaves may indicate excess moisture. Remove any rotten cuttings immediately. Patience is important during this stage. Proper care ensures strong roots.
Transplanting Rooted Oleander Cuttings
Once roots are well developed, transplant the cutting to a larger pot or ground. Handle gently to avoid root damage. Choose a sunny location for mature growth. Water after transplanting. Allow the plant to adjust gradually. Avoid fertilizer immediately after transplant. Strong roots support fast establishment. Transplanting completes the propagation process.
Fertilizer Use After Propagation
Oleander requires minimal fertilization. Apply light organic compost after a few weeks. Excess fertilizer can harm young plants. Balanced nutrients support healthy growth. Slow-release fertilizers work well. Avoid high nitrogen initially. Proper feeding strengthens the plant. Healthy plants flower better in future.
Common Problems During Propagation
Stem rot is a common issue caused by overwatering. Fungal infection occurs in poorly drained soil. Wilting indicates moisture imbalance. Poor quality cuttings reduce success. Extreme temperatures slow rooting. Pest attacks are rare but possible. Proper hygiene prevents problems. Early correction improves results.
Advantages of Oleander Cutting Propagation
Cutting propagation is fast and reliable. Plants remain identical to the parent. Flowering occurs earlier than seed-grown plants. Cost is minimal. Space requirement is low. High success rate makes it ideal for nurseries. Suitable for beginners. This method is widely recommended.
Comparison: Seed vs Cutting Propagation
| Aspect | Seed Propagation | Cutting Propagation |
|---|---|---|
| Plant Uniformity | Variable | Identical |
| Time to Flower | Long | Short |
| Success Rate | Moderate | High |
| Skill Required | Basic | Basic |
| Reliability | Low | High |
Oleander in Pots and Gardens
Oleander grows well in both pots and ground. Potted plants are easy to manage. Garden-grown plants become large shrubs. Cutting-grown plants adapt well. Regular pruning maintains shape. Oleander enhances landscape beauty. Ideal for fences and borders. Propagation supports landscaping needs.
Safety Precautions While Handling Oleander
Oleander is toxic if ingested. Always wear gloves when handling cuttings. Avoid contact with eyes and mouth. Keep plants away from children and pets. Wash hands after work. Safety awareness is essential. Responsible handling ensures safe gardening.
Long-Term Care of Oleander Plants
Once established, oleander requires minimal care. Regular watering during dry periods is sufficient. Pruning encourages bushy growth. Remove dead branches periodically. Pest resistance is strong. Proper sunlight ensures flowering. Long-term care keeps plants healthy.
Environmental Benefits of Oleander
Oleander helps reduce air pollution. It tolerates urban conditions. Low water requirement supports sustainability. Provides greenery year-round. Suitable for roadside plantations. Propagation supports green spaces. Environmentally beneficial plant.
Conclusion
Oleander cutting propagation is a simple and effective method. It allows gardeners to grow healthy, uniform plants quickly. With proper timing and care, success rates are high. This method suits beginners and professionals alike. Oleander’s hardy nature makes propagation easy. Following correct steps ensures strong growth. It is an excellent choice for ornamental gardening.