
Sweet potatoes are not only delicious but also packed with nutrients, including fiber, vitamins, and antioxidants. While traditionally grown in the ground, they can also thrive in containers—especially grow bags. This method is perfect for gardeners with limited space, poor soil, or even urban balconies. Growing sweet potatoes in bags makes planting, watering, harvesting, and rotating crops easier while reducing pest and disease problems.
In this guide, we’ll walk through everything you need to know about growing sweet potatoes in bags: from selecting the right variety and preparing bags to planting, care, and harvesting for a bountiful crop.
Why Grow Sweet Potatoes in Bags?
Growing sweet potatoes in bags offers several advantages:
✔ Space Efficiency
Perfect for small gardens, patios, and balconies where ground space is limited.
✔ Soil Control
You can provide rich, loose soil, ideal for tuber development, even if your garden soil is poor or heavy clay.
✔ Improved Drainage
Grow bags naturally allow excess water to escape, preventing tuber rot.
✔ Pest and Disease Reduction
Tubers are less exposed to soil pests like nematodes, slugs, or fungi.
✔ Easy Harvesting
No digging through the ground; just tip the bag or loosen the soil for an effortless harvest.
Step 1: Selecting Sweet Potato Varieties
Choosing the right variety is crucial for bag cultivation.
Popular Varieties
- Beauregard: Sweet, orange flesh; high yield
- Georgia Jet: Early-maturing, resistant to pests
- Japanese Sweet Potato: Sweet, purple-skinned variety
- Vardaman: Compact, good for small spaces
Tip
- Choose compact or medium-size varieties for bags to avoid overcrowding.
- Check local climate suitability for best results.
Step 2: Choosing the Right Grow Bags
The bag you select impacts root and tuber development.
Bag Size
- Minimum: 15–20 gallons (60–80 liters)
- Depth: At least 12–15 inches to accommodate long tubers
Material
- Fabric grow bags: breathable, lightweight, and portable
- Plastic bags: cheaper but less breathable; ensure drainage holes
Tips
- Ensure the bag has proper drainage holes at the bottom.
- Fabric bags naturally allow air pruning, promoting healthy tubers.
Step 3: Preparing the Soil Mix
Sweet potatoes need loose, well-draining, nutrient-rich soil.
Ideal Soil Mix
- 40% garden soil
- 40% compost or well-rotted manure
- 20% sand or cocopeat for aeration
Optional Fertilizers
- Balanced NPK fertilizer (10-10-10) during planting
- Bone meal or rock phosphate for root development
Tip
- Avoid heavy clay soil in bags, as it can restrict tuber growth and lead to rotting.
Step 4: Obtaining Sweet Potato Slips
Sweet potatoes are grown from slips, not seeds.
Steps to Prepare Slips
- Select a healthy, mature sweet potato.
- Place it in water or moist soil, keeping half submerged.
- After 2–3 weeks, sprouts (slips) will grow from the eyes.
- Remove slips carefully, leaving 3–4 inches of stem attached.
- Root the slips in water for 1–2 weeks before planting in the bag.
Tip: Use disease-free, healthy tubers to ensure strong plants.
Step 5: Planting Sweet Potatoes in Bags
Steps
- Fill the grow bag with your prepared soil mix, leaving 3–4 inches at the top.
- Make small holes about 6 inches apart for each slip.
- Insert slips into the holes, burying the base 2–3 inches deep.
- Firm the soil gently around the stem.
- Water thoroughly to settle the soil.
Tip
- Plant 2–3 slips per 15–20 gallon bag to avoid overcrowding.
- For maximum yield, grow one strong slip per smaller bag.
Step 6: Watering Sweet Potatoes in Bags
Proper watering is critical for tuber growth.
Guidelines
- Water thoroughly after planting.
- Keep soil consistently moist but not waterlogged.
- Reduce watering slightly as tubers mature to prevent splitting.
Tip: Overwatering can lead to rot; under-watering causes small, misshapen tubers.
Step 7: Sunlight Requirements
Sweet potatoes need full sun to thrive.
Requirements
- At least 6–8 hours of direct sunlight daily.
- In hot climates, partial afternoon shade can prevent leaf scorch.
Tip: Rotate or move bags occasionally to ensure all sides receive sunlight.
Step 8: Fertilizing Sweet Potatoes
Container-grown sweet potatoes need periodic fertilization.
Fertilizer Tips
- Use a low-nitrogen, high-phosphorus, and potassium fertilizer to encourage tuber growth.
- Feed every 3–4 weeks after initial growth.
- Organic options: compost tea, fish emulsion, seaweed extract.
Warning: Too much nitrogen encourages vine growth but reduces tuber yield.
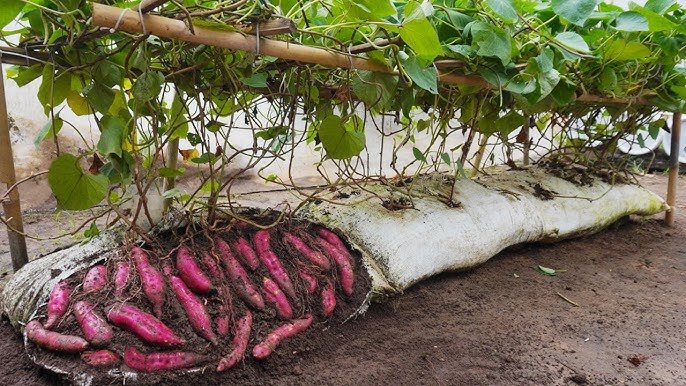
Step 9: Pruning and Vine Management
Sweet potatoes produce long vines that can spread beyond the bag.
Tips
- Allow vines to trail naturally or prune for compact growth.
- Train vines to climb a trellis or support structure to save space.
- Avoid cutting too much; leave 6–8 inches of foliage for photosynthesis.
Step 10: Pest and Disease Management
Bag-grown sweet potatoes are less prone to soil pests but may still face:
Common Pests
- Aphids
- Whiteflies
- Sweet potato weevil
Organic Solutions
- Spray neem oil or insecticidal soap weekly
- Remove affected leaves
- Encourage beneficial insects
Diseases
- Fungal leaf spots
- Root rot (due to overwatering)
Prevention: Good drainage, clean containers, and proper airflow reduce risks.
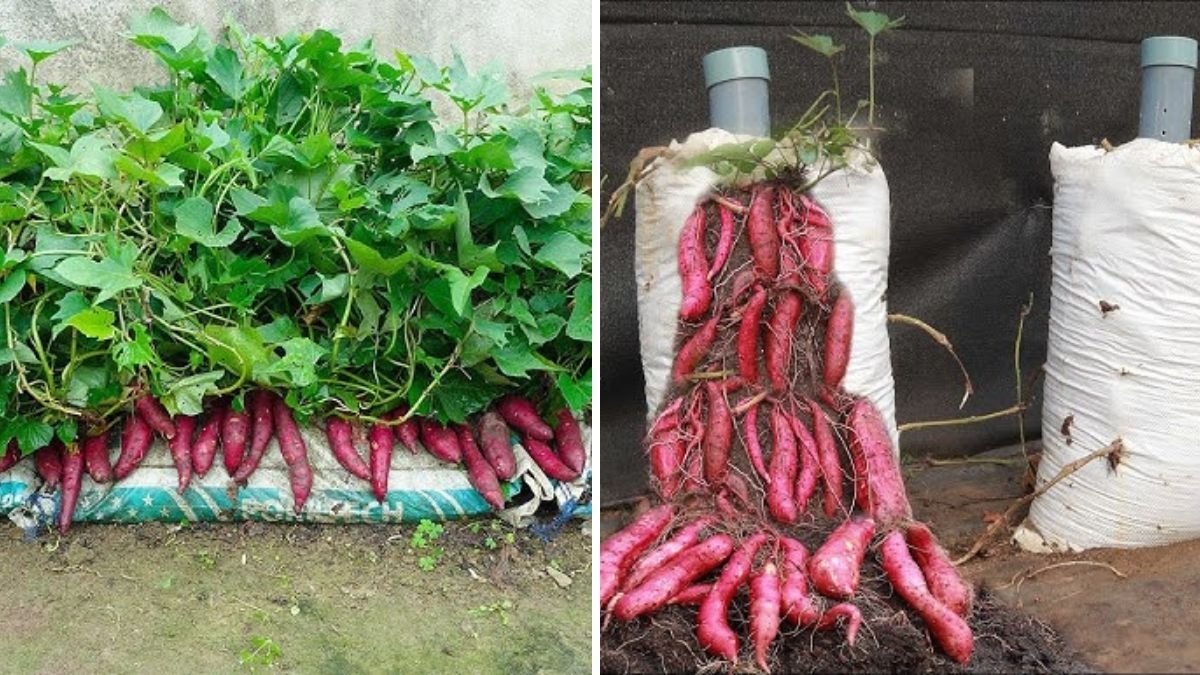
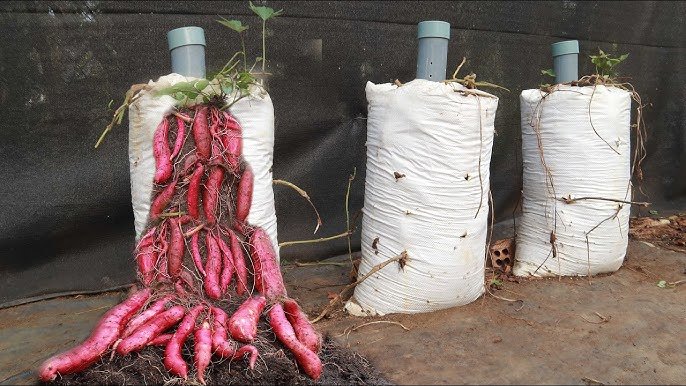
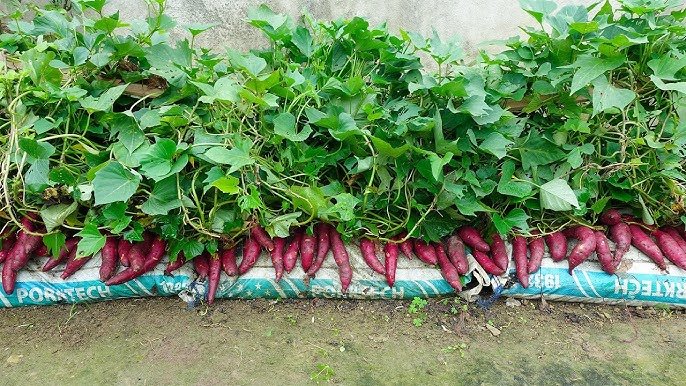
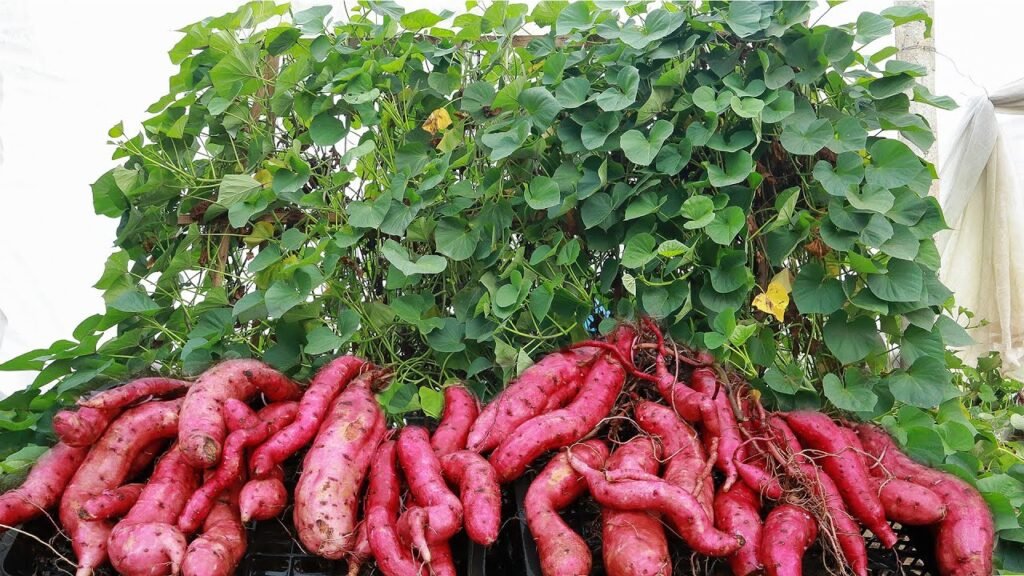
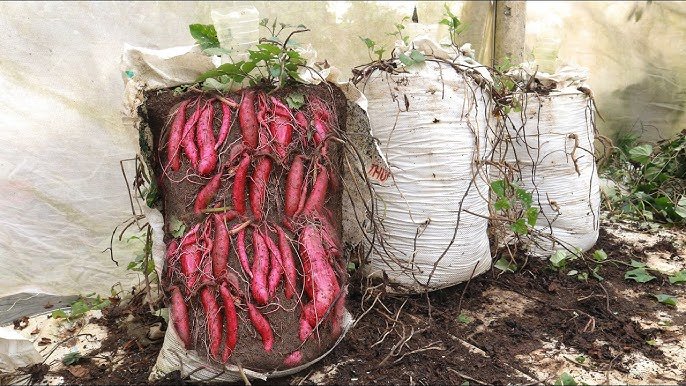
Step 11: Harvesting Sweet Potatoes from Bags
Harvesting in bags is simple and rewarding.
When to Harvest
- 3–5 months after planting, depending on variety
- Leaves may begin yellowing as tubers mature
Steps
- Gently tip the bag or loosen the soil from the top.
- Carefully remove the tubers, avoiding cuts or bruises.
- Brush off excess soil and allow them to cure in a warm, dry place for 7–10 days.
Tip: Cure tubers to enhance sweetness and shelf life.
Step 12: Benefits of Growing Sweet Potatoes in Bags
- Space Efficiency: Perfect for small gardens and balconies
- Easy Maintenance: Watering, fertilization, and pruning are simpler
- Better Soil Control: Prevents rot and poor tuber growth
- Pest Reduction: Less exposure to soil-borne pests
- Convenient Harvest: No digging through the ground, minimal effort
Step 13: Tips for Year-Round Sweet Potato Gardening
- Use succession planting: start a new bag every 6–8 weeks.
- Move bags indoors or to a sheltered location during cold weather.
- Use slow-release fertilizers for extended growth cycles.
- Rotate varieties to enjoy different flavors and colors.
Conclusion: Grow Sweet Potatoes in Bags for a Bountiful Harvest
Growing sweet potatoes in bags is a practical, space-saving, and rewarding method for home gardeners. By choosing the right variety, using suitable grow bags, preparing nutrient-rich soil, and following proper watering, fertilization, and pruning techniques, anyone can enjoy fresh, healthy, and abundant sweet potatoes—even in limited spaces.
Whether you have a balcony, rooftop, or small backyard, bag cultivation allows you to grow this nutritious and versatile crop easily, with minimal effort and maximum yield. With patience, care, and consistent harvesting, your bag-grown sweet potatoes will provide delicious meals and add a touch of greenery to your home garden.